How to Make a Clay Pumpkin and Clay Ghost
Welcome to this delightful DIY project where we will create a charming clay pumpkin and a spooky clay ghost! This easy DIY project is perfect for beginners and involves simple materials you probably already have at home. Whether you’re decorating for Halloween, Thanksgiving, or looking for a fun craft to engage your creativity, this homemade decor will add a festive touch to your space.
WHY YOU WILL LOVE THIS DIY PROJECT
Making clay pumpkins and ghosts is a wonderful way to get into the festive spirit! Here are a few reasons why you will enjoy this craft:
- Easy for beginners: This project is straightforward and perfect for those newer to crafting.
- Uses simple materials: You only need a few types of polymer clay, which are easy to find and work with.
- Budget-friendly: Polymer clay is inexpensive and can be used for multiple projects.
- Quick to make: You can complete this project in just a few hours, allowing you to create multiple items if desired.
- Great for home decor: Once completed, your clay creations can enhance your living space or be used as seasonal decorations.
- Easy to customize: You can personalize your clay pumpkin and ghost with different colors and styles.
PROJECT DETAILS
Skill Level
Beginner-friendly. This craft is simple enough for anyone, including children and novice crafters.
Estimated Time
Approximately 1-2 hours. This includes the time for preparation, creating your pieces, and baking them.
Approximate Cost
Around $10-15. This estimate covers the cost of polymer clay and any basic tools needed.
Best For
This project is ideal for home decor, gifts, parties, or seasonal decorating and is suitable for all ages.
Project Type
DIY crafts for beginners; great for making seasonal decorations or handmade gifts.
TOOLS AND EQUIPMENT NEEDED
Oven
You will need an oven to bake the polymer clay, which sets the designs and makes them durable.
Rolling Pin
A small rolling pin is helpful for conditioning and flattening the clay to your desired thickness.
Craft Knife
This will be used for cutting and shaping the clay into your pumpkin and ghost designs.
Baking Sheet
You will need a baking sheet to place your creations on while they bake.
MATERIALS
Glow in the Dark Polymer Clay
This material is essential for making your ghost. It adds a fun effect that will glow in the dark after being charged with light.
Polymer Clay (black, orange, brown, and green)
You will use these colors to create your pumpkin and ghost. Orange is for the pumpkin’s body, brown for the stem, black for the eyes, and green for the tendril.
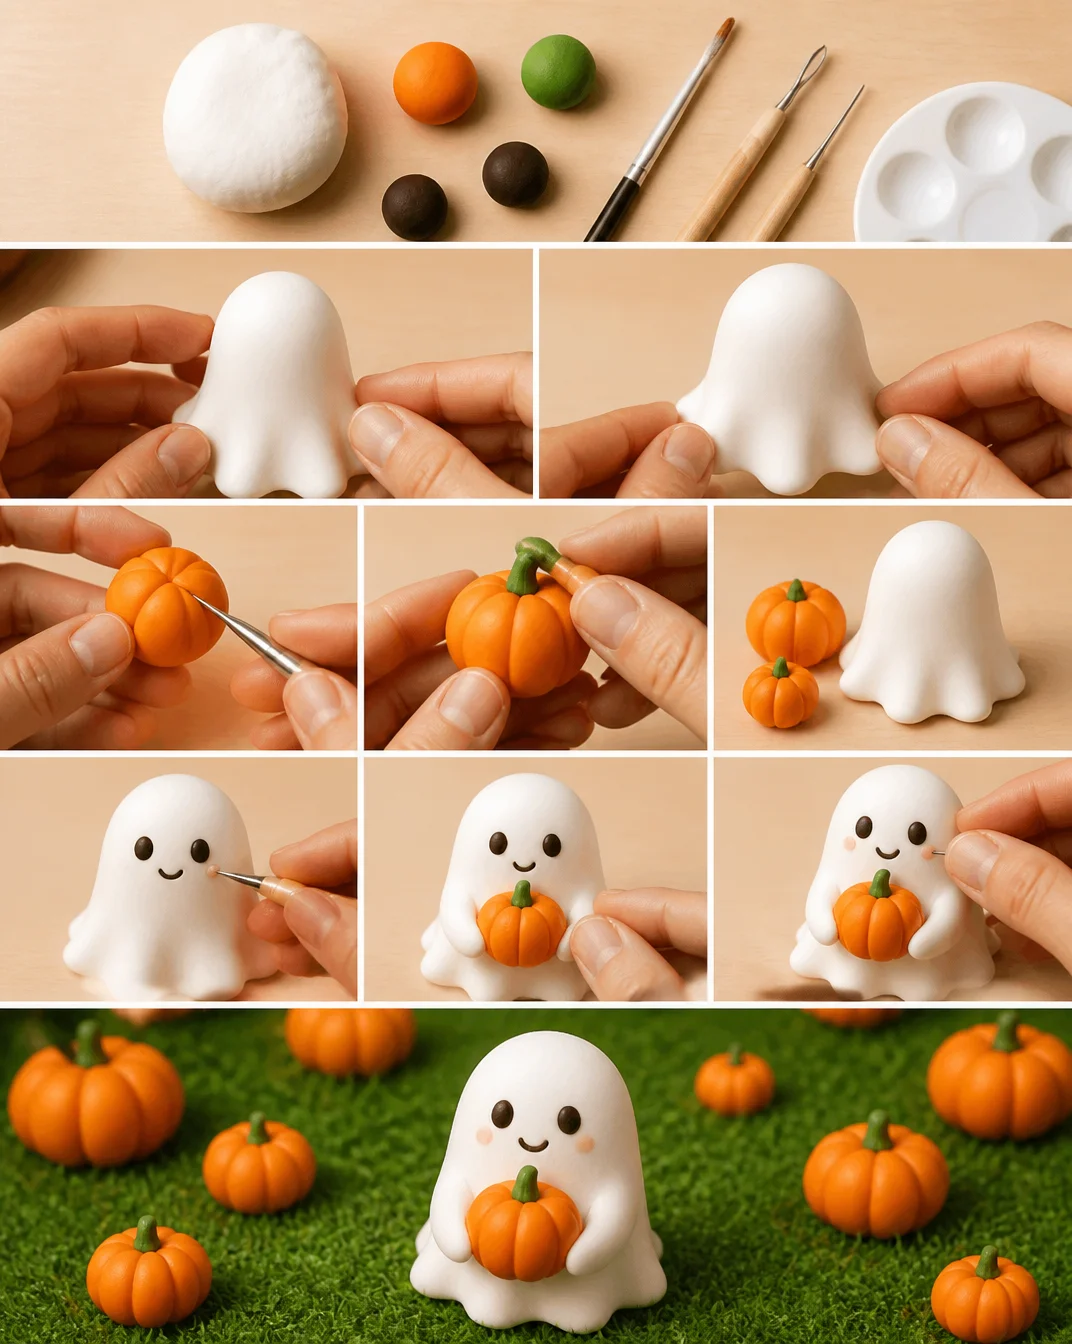
HOW TO MAKE Clay Pumpkin and Clay Ghost
Step 1: Prepare Your Workspace
Start by clearing a flat, clean surface to work on. Lay down some parchment paper to make cleanup easier and prevent the clay from sticking to the surface.
Step 2: Make the Clay Ghost
Knead the Glow in the Dark Polymer Clay
Break off a small piece of the glow-in-the-dark polymer clay and knead it until it’s soft and pliable. This step helps to condition the clay, making it easier to shape.
Shape the Ghost’s Body
Roll the conditioned clay into an oval shape for the ghost’s body. Use your fingers to pinch the top slightly to form the head of the ghost.
Hollow Out the Bottom
Gently hollow out the bottom of the oval shape to create a base for the ghost. This will help it stand without toppling over.
Add Facial Features
Create two small balls from the black polymer clay for the ghost’s eyes. Flatten them slightly and attach them to the ghost’s face by gently pressing them into the clay.
Step 3: Make the Clay Pumpkin
Condition the Orange Polymer Clay
Take a piece of orange polymer clay and knead it until soft, just like you did with the ghost clay.
Shape the Pumpkin
Roll the conditioned orange clay into a ball. Once you have a sphere, gently press down on the top to create an indent. This will form the pumpkin’s rounded top.
Create Sections on the Sides
With your craft knife, sculpt the sides of the pumpkin into sections by carving small grooves. This adds realism to your pumpkin.
Add the Stem and Tendril
Roll a small piece of brown clay into a cylinder for the stem, and attach it to the top of the pumpkin. For the tendril, take a small length of green clay, curl it, and attach it to the pumpkin to add character.
Step 4: Bake the Clay Creations
Place both the ghost and the pumpkin on a baking sheet lined with parchment paper. Bake them according to the instructions provided on the polymer clay packaging. Usually, it takes around 15-30 minutes at 275°F (135°C).
Step 5: Allow to Cool
After baking, take the creations out of the oven and let them cool completely before handling them.
TIPS AND TRICKS
- Choosing Materials: Ensure to use high-quality polymer clay for better durability.
- Conditioning Clay: Kneading the clay thoroughly is essential; it makes shaping easier and improves its texture.
- Cutting Tips: When cutting clay, use a sharp craft knife for precise lines. This will help avoid ragged edges.
- Storing Clay: Keep any leftover clay in an airtight container to prevent it from drying out.
- Cleaning Workspace: Clean your surface well after crafting to avoid mishaps with future projects.
VARIATIONS AND CUSTOMIZATION IDEAS
- Different Colors: Experiment with different colors of clay for the pumpkin and ghost to create unique designs.
- Various Sizes: Scale your pieces up or down for miniatures or larger decorations.
- Seasonal Versions: For a fun twist, make ghosts in additional colors like purple or white, suitable for other holidays.
- Different Patterns: Add textures using tools or stamps to give your pumpkin and ghost a more distinctive look.
- Personalized Versions: Consider adding names or messages on the pumpkin for gifts or place markers.

Clay Pumpkin and Clay Ghost FAQ
How difficult is this clay project?
This craft is considered beginner-friendly, making it suitable for people of all skill levels, including children.
What materials do I need?
You will need polymer clay in various colors, specifically glow-in-the-dark, orange, brown, and green. Basic tools like a craft knife and rolling pin are also necessary.
How long does it take to make these clay creations?
The entire project can take about 1-2 hours, from preparation through to baking and cooling.
How should I store my clay projects?
To extend their life, store your clay creations in a cool, dry place. Avoid direct sunlight to prevent fading, especially for pieces that use glow-in-the-dark clay.
How do I clean my tools after crafting?
Wipe down your tools with a damp cloth or wet wipe after use to remove any clay residue. For tougher spots, you may need to scrub gently with a soft brush.
CONCLUSION
Crafting a clay pumpkin and ghost is an enjoyable and straightforward DIY project that brings seasonal flair to your home. This beginner-friendly craft uses simple materials and techniques, making it accessible to everyone. It’s not only a budget-friendly way to decorate but also a fantastic opportunity to express your creativity.
So grab your polymer clay and crafting tools, and try making these adorable seasonal decorations today! Feel free to share your finished projects or any fun customization ideas you come up with. Happy crafting!

Clay Pumpkin and Clay Ghost
Ingredients
Method
- Start by clearing a flat, clean surface to work on. Lay down some parchment paper to make cleanup easier and prevent the clay from sticking.
- Break off a small piece of the glow-in-the-dark polymer clay and knead it until soft and pliable.
- Roll the conditioned clay into an oval shape for the ghost's body. Pinch the top slightly to form the head.
- Gently hollow out the bottom of the oval shape to create a base for the ghost.
- Create two small balls from the black polymer clay for the ghost's eyes. Flatten them slightly and attach them to the ghost's face.
- Take a piece of orange polymer clay and knead it until soft.
- Roll the conditioned orange clay into a ball and gently press down on the top to create an indent.
- Sculpt the sides of the pumpkin into sections using a craft knife to add realism.
- Roll a small piece of brown clay into a cylinder for the stem and attach it to the pumpkin's top.
- For the tendril, take a small length of green clay, curl it, and attach it to the pumpkin.
- Place both the ghost and the pumpkin on a baking sheet lined with parchment paper. Bake according to the polymer clay instructions, typically for 15-30 minutes at 275°F (135°C).
- After baking, take the creations out of the oven and let them cool completely before handling.