DIY Halloween Painted Mason Jars
DIY Halloween Painted Mason Jars are a fun and easy craft that can add a festive touch to your home’s decor during the spooky season. This simple craft project is perfect for beginners and can easily be customized to match your personal style and Halloween themes. Whether you’re looking for budget-friendly decor or handmade gifts for friends, painted mason jars can serve as versatile pieces for any occasion. You will enjoy creating these charming jars, and they make perfect decorative items, candle holders, or party favors during Halloween.
WHY YOU WILL LOVE THIS DIY HALLOWEEN PAINTED MASON JAR
Making DIY Halloween Painted Mason Jars is a delight for many reasons:
- Easy for Beginners: This project is straightforward and doesn’t require advanced crafting skills, making it an ideal project for novice crafters.
- Uses Simple Materials: You only need a few common materials that are easy to find.
- Budget-Friendly: With inexpensive materials, this craft won’t break your bank, making it a great choice for budget-conscious decorators.
- Quick to Make: You can create these painted jars in just a few hours, perfect for last-minute decorating or gifting.
- Great for Home Decor: These jars can brighten up any Halloween display with their playful designs.
- Easy to Customize: With the potential to use various colors and designs, your painted mason jars can reflect your unique style and creativity.
PROJECT DETAILS
Skill Level
Beginner – This project is very accessible for crafters of all skill levels.
Estimated Time
1-2 hours – This includes time for drying after painting.
Approximate Cost
$10-$15 – Costs primarily depend on the number of jars and types of paint you choose.
Best For
Home decor, gifts, and seasonal decorating – Perfect for adding a festive touch to Halloween or as thoughtful handmade gifts.
Project Type
DIY project – A fun, creative way to spruce up your home with personal touches.
TOOLS AND EQUIPMENT NEEDED
Paintbrushes
Use various sizes of paintbrushes to create different designs on your mason jars.
Palette
A palette will help mix colors and keep your workspace organized.
Ruler
A ruler can be handy for measuring or marking where you want to place your designs.
MATERIALS
Mason Jar(s)
These will serve as the base of your project, providing a container that can hold your decorative elements or candles.
Multi-Surface Acrylic Paint
This paint is vital for applying color on the jars, allowing for both solid backgrounds and detailed designs.
Twine
Twine adds a rustic charm by wrapping around the neck of the jar, enhancing its overall look.
HOW TO MAKE DIY HALLOWEEN PAINTED MASON JARS
Step 1: Gather Your Supplies
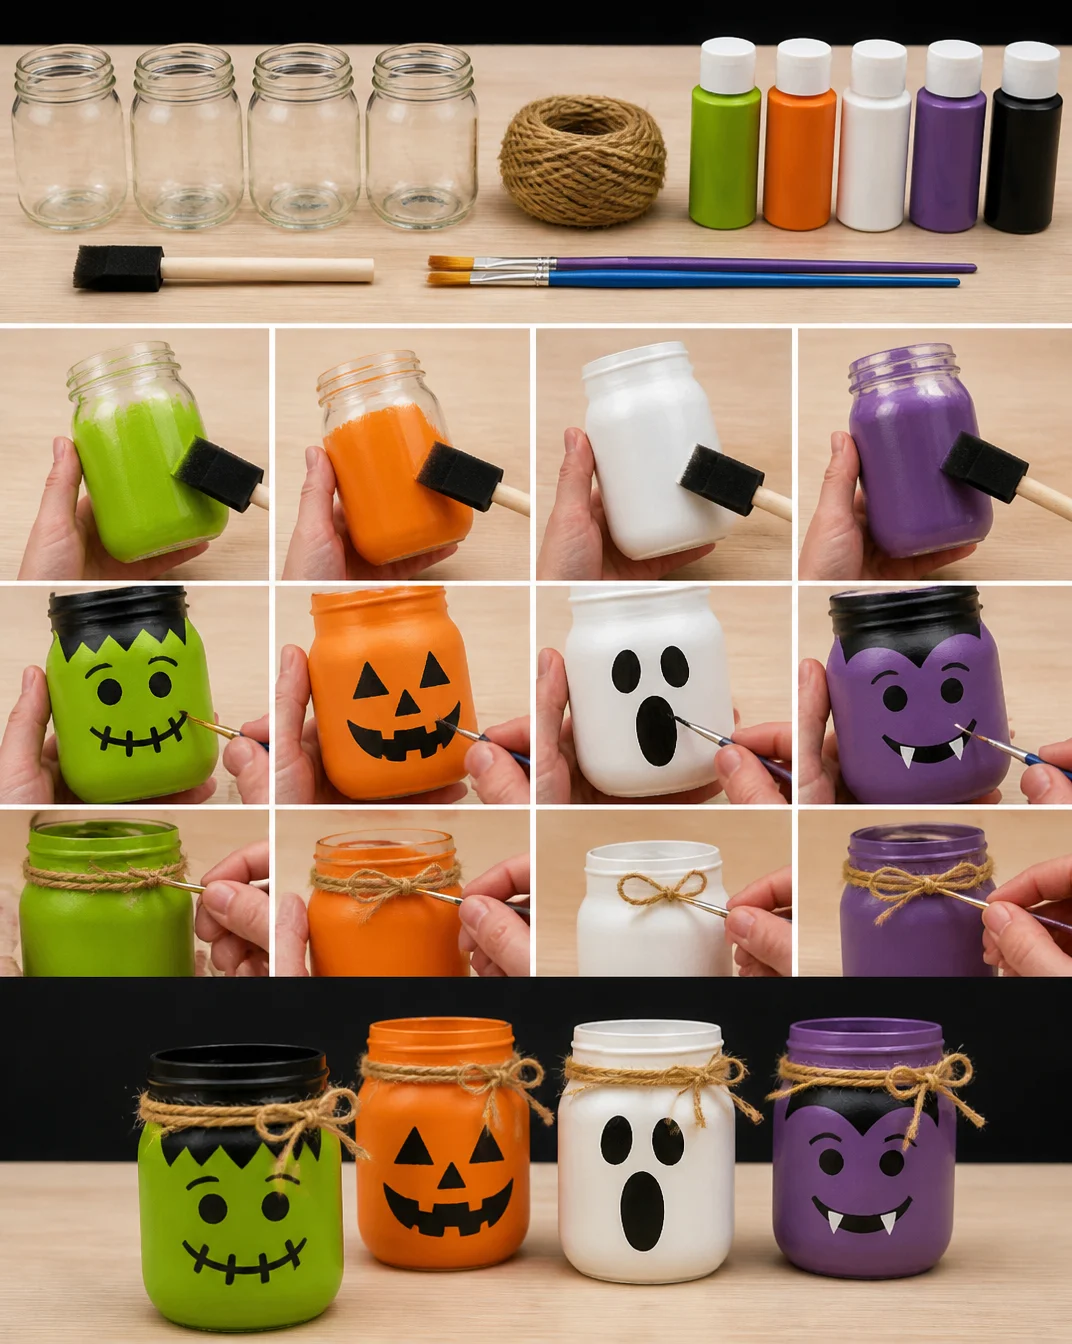
Begin by collecting all your supplies: mason jars, multi-surface acrylic paint, paintbrushes, twine, a ruler, and a palette. Ensure your workspace is clear for easy access to everything you need.
Step 2: Clean Your Mason Jar
Wash the mason jar with soap and water to remove dust and grease. Make sure it is dry before applying any paint, as excess moisture can cause uneven coloring.
Step 3: Paint the Base Color
Using a large paintbrush, apply a base color of your choice to the outside of the mason jar. Classic Halloween colors like orange or black work well, but feel free to choose any shade you prefer. Allow the paint to dry completely; you might need to apply a second coat for a bolder look.
Step 4: Create Your Designs
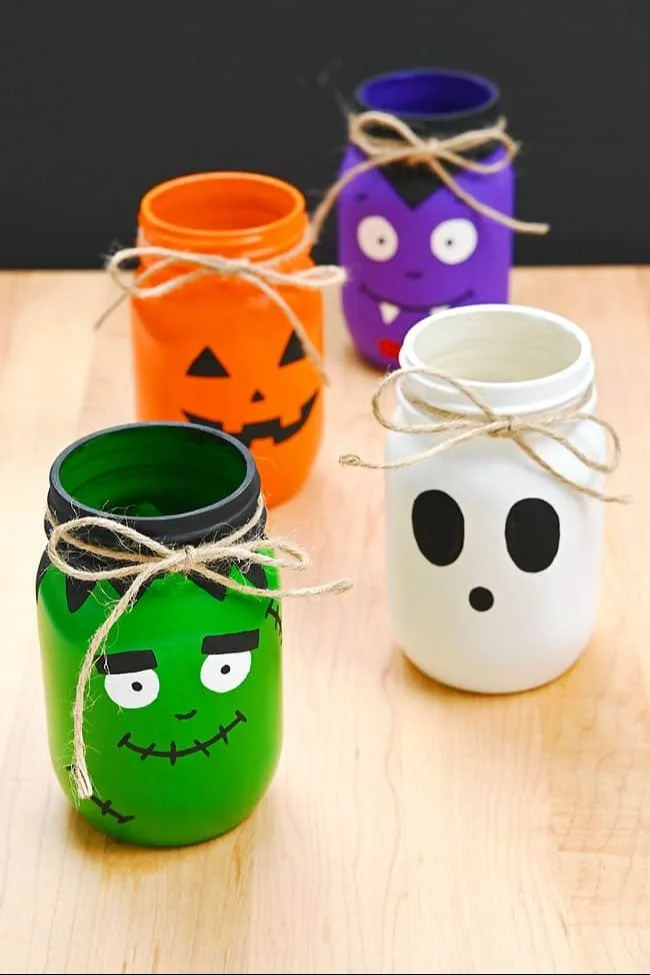
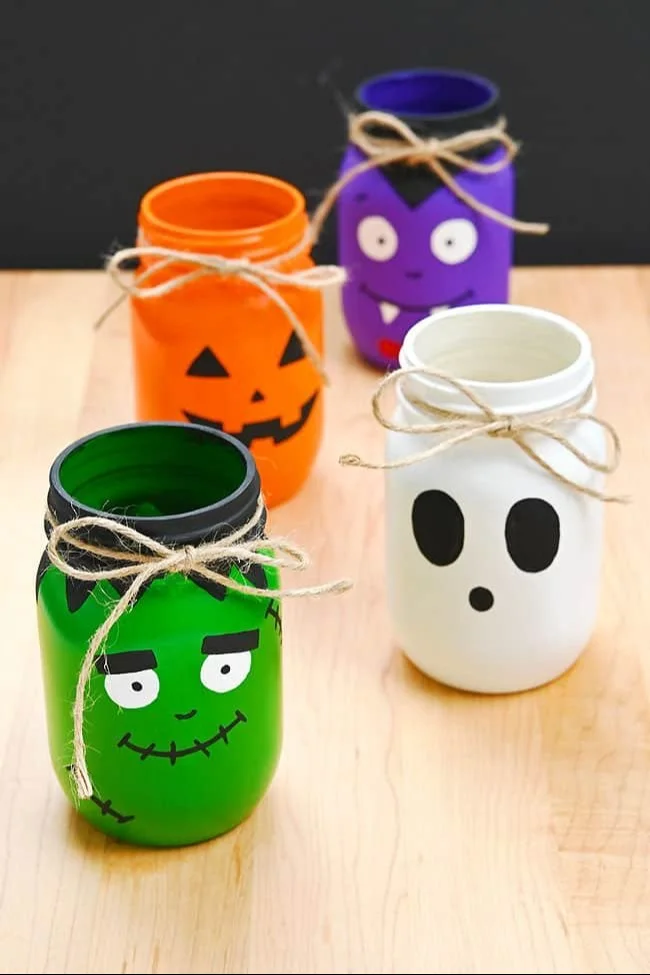
Once your base coat is dry, take a fine tip brush and use black acrylic paint to create a jack-o-lantern face or any Halloween design of your choice. Draw spooky eyes, a creepy smile, or even a ghostly figure. You can also use stencils for easier designs to ensure a nice finish.
Step 5: Add Twine
Cut a piece of twine and wrap it around the neck of the jar. Tie it into a bow or a knot, adding a touch of rustic charm to your Halloween creation.
Step 6: Finishing Touches
Let everything dry completely. If you intend to use the jars for candles, make sure the paint is fully set before inserting them.
TIPS AND TRICKS
- Choosing Materials: Look for multi-surface acrylic paint, as this will adhere well to glass surfaces.
- Mixing Colors: Experiment with mixing colors on the palette to achieve different shades.
- Avoiding Common Mistakes: Dry thoroughly before applying a second coat to avoid peeling paint.
- Easier Application: Use stencils for designs to make it simpler, especially if you’re not confident in your painting skills.
- Better Finish: Always apply thinner layers of paint instead of heavy coats.
- Storage: If you have leftover paint, store it in a cool, dry place to keep it usable for future projects.
- Durability: To increase the lifespan of your painted jars, consider applying a clear seal over the paint once it fully dries.
- Working Safely: Make sure to work in a well-ventilated area, especially if using spray paint.
VARIATIONS AND CUSTOMIZATION IDEAS
- Different Colors: Try using different base colors for a mix-and-match look.
- Seasonal Versions: Create similar designs for other holidays or seasons, like pastel colors for Easter or red and green for Christmas.
- Holiday Versions: Decorate jars specifically for Halloween with ghostly themes or for Thanksgiving with autumn leaves.
- Different Sizes: Use various sizes of mason jars for multi-dimensional displays.
- Different Patterns: Experiment with stripes, polka dots, or swirling designs for a fun look.
- Personalized Versions: Add names or special messages on the jars to personalize your gifts.
- Different Finishes: Consider adding glitter or glow-in-the-dark paint for special effects.
DIY Halloween Painted Mason Jar FAQ
1. How difficult is this project?
This DIY project is beginner-friendly and very easy to make. Anyone can create these decorated jars with just a bit of patience.
2. What materials do I need?
You will need mason jars, multi-surface acrylic paint, paintbrushes, and twine for this project.
3. How long does this craft take to complete?
The estimated time for completing this project is around 1-2 hours, including drying time for the paint.
4. How should I store my painted mason jars?
Once completed and dried, store your mason jars in a cool, dry place. They can last a long time if handled carefully.
5. Can I use these jars outdoors?
Yes, but be sure to use outdoor-safe paint or a sealant to protect the designs from the elements if they are placed outside.
CONCLUSION
Creating DIY Halloween Painted Mason Jars is a fun and budget-friendly craft that anyone can enjoy. With simple materials and easy-to-follow instructions, this project is perfect for those looking to add a personal touch to their home decor or give handmade gifts. It’s also an excellent decorative piece for your Halloween festivities.
So gather your materials, unleash your creativity, and enjoy this simple craft that transforms ordinary mason jars into festive masterpieces. Don’t forget to share your experience and any customization ideas you come up with while making your own painted jars!
DIY Halloween Painted Mason Jars
Ingredients
Method
- Gather all your supplies: mason jars, multi-surface acrylic paint, paintbrushes, twine, a ruler, and a palette.
- Wash the mason jar with soap and water to remove dust and grease. Ensure it is dry before applying any paint.
- Using a large paintbrush, apply a base color of your choice to the outside of the mason jar and let it dry completely.
- Once the base coat is dry, use a fine tip brush and black acrylic paint to create a jack-o-lantern face or any Halloween design you prefer.
- Cut a piece of twine and wrap it around the neck of the jar, tying it into a bow or a knot.
- Let everything dry completely. If you intend to use the jars for candles, ensure the paint is fully set before inserting them.