
INTRODUCTION
Easy Cookie Cups are small, soft cookie shells that hold tasty fillings. They are fun to bake and fun to eat. You can fill them with chocolate, candy, cream, or fruit. They work for snacks, parties, and holiday treats. If you like simple sweets and small bites, you will enjoy making these at home. If you enjoy other easy sweets, try a similar holiday treat like this easy Christmas sugar cookie fudge for more ideas.
WHY YOU WILL LOVE THIS RECIPE
You will love these cookie cups because they are fast, flexible, and friendly to make. The dough is simple and uses common pantry ingredients. You can change the fillings to match your mood or the season. Kids can help press the dough into pans and add toppings. These cups bake evenly and keep their shape, so you will get a crisp edge and a soft center. They also store well, making them ideal for school lunches, road trips, and dessert plates. If you enjoy the cozy flavors of sugar and spice, this recipe fits well with other classics such as the chewy maple cinnamon cookies with white chocolate you might have tried before.
HOW TO MAKE Easy Cookie Cups
Making Easy Cookie Cups is clear and fun. You will make dough, shape it, bake it, and add a filling. Follow the steps below and you will have a tray of neat cookie cups in under an hour.
EQUIPMENT NEEDED
- Large mixing bowl
- Medium bowl
- Measuring cups and spoons
- Electric mixer or wooden spoon
- Muffin pan (12-cup is best)
- Cookie scoop or tablespoon
- Baking sheet (optional for regular cookies)
- Cooling rack
- Spatula
- Small bowl for fillings
Ingredients You’ll Need :
2 1/2 cups all purpose flour, 1 cup sugar, 1 cup brown sugar, packed, 1 tsp baking soda, 2 tsp baking powder, 3/4 tsp salt, 1 tblsp vanilla extract, 2 large eggs, 1/2 cup unsalted butter, room temperature, 1 cup candy, nuts or dried fruit – or more if desired, 1/3 cup cocoa powder, unsweetened ((optional)), 1/2-3/4 cup chocolate, caramel, peanut butter or butterscotch chips (more or less too taste), sweetened shredded coconut, chocolate or candy coated eggs, cooking spray
STEP-BY-STEP INSTRUCTIONS :
Making the Cookie Dough
- Preheat the oven to 350°F (175°C). Grease a muffin pan with cooking spray or use paper liners.
- In a bowl, whisk the flour, baking soda, baking powder, and salt. Set it aside.
- In a large bowl, cream the butter, sugar, and brown sugar until smooth. Add the eggs one at a time and mix. Stir in the vanilla.
- Slowly add the dry mix to the wet mix. Stir or mix until the dough forms. If you want chocolate cups, sift in the 1/3 cup of unsweetened cocoa powder and mix until even.
- Fold in 1 cup of candy, nuts, or dried fruit if you like them in the dough.
Making Regular Cookies
- If you want regular cookies as well, scoop dough onto a baking sheet lined with parchment.
- Flatten slightly and bake at 350°F for 8–10 minutes or until edges are light brown.
- Let cool on the sheet for a few minutes, then transfer to a rack.
How to make Cookie Baskets
- Scoop a heaping tablespoon of dough for each cup into the prepared muffin pan.
- Press the dough into the bottom and up the sides to form a cup shape. The dough should come up the sides about 1/4 to 1/2 inch.
- Bake for 10–12 minutes until the edges are golden brown and the centers are set.
- Remove from the oven and immediately press the center with the back of a spoon or a small cup to deepen the cup shape as it cools. Let cool fully in the pan, then carefully remove.
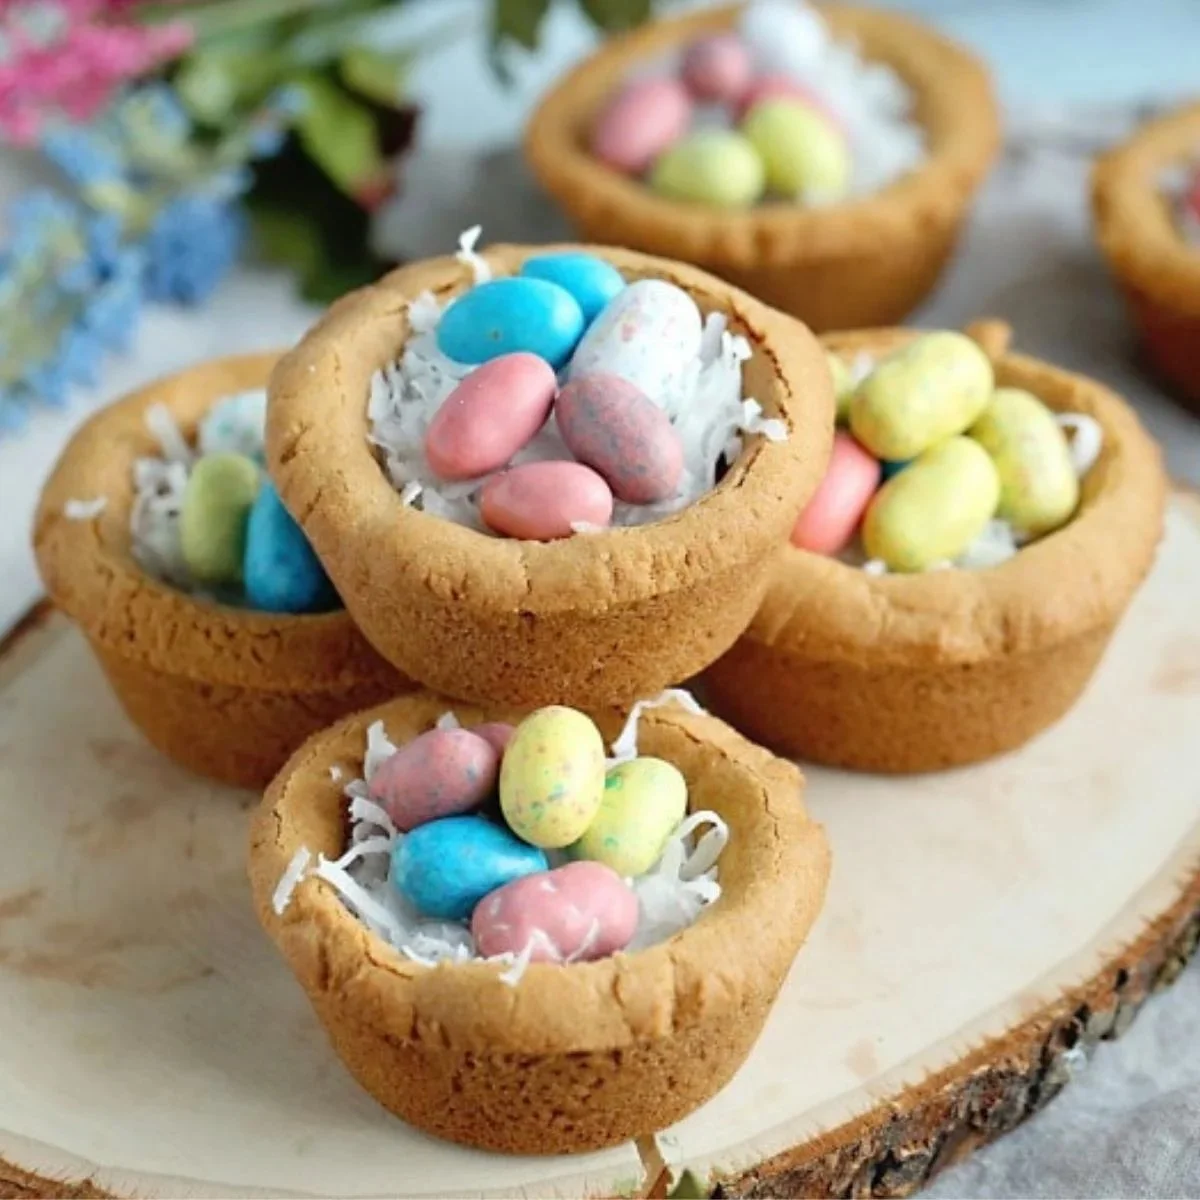
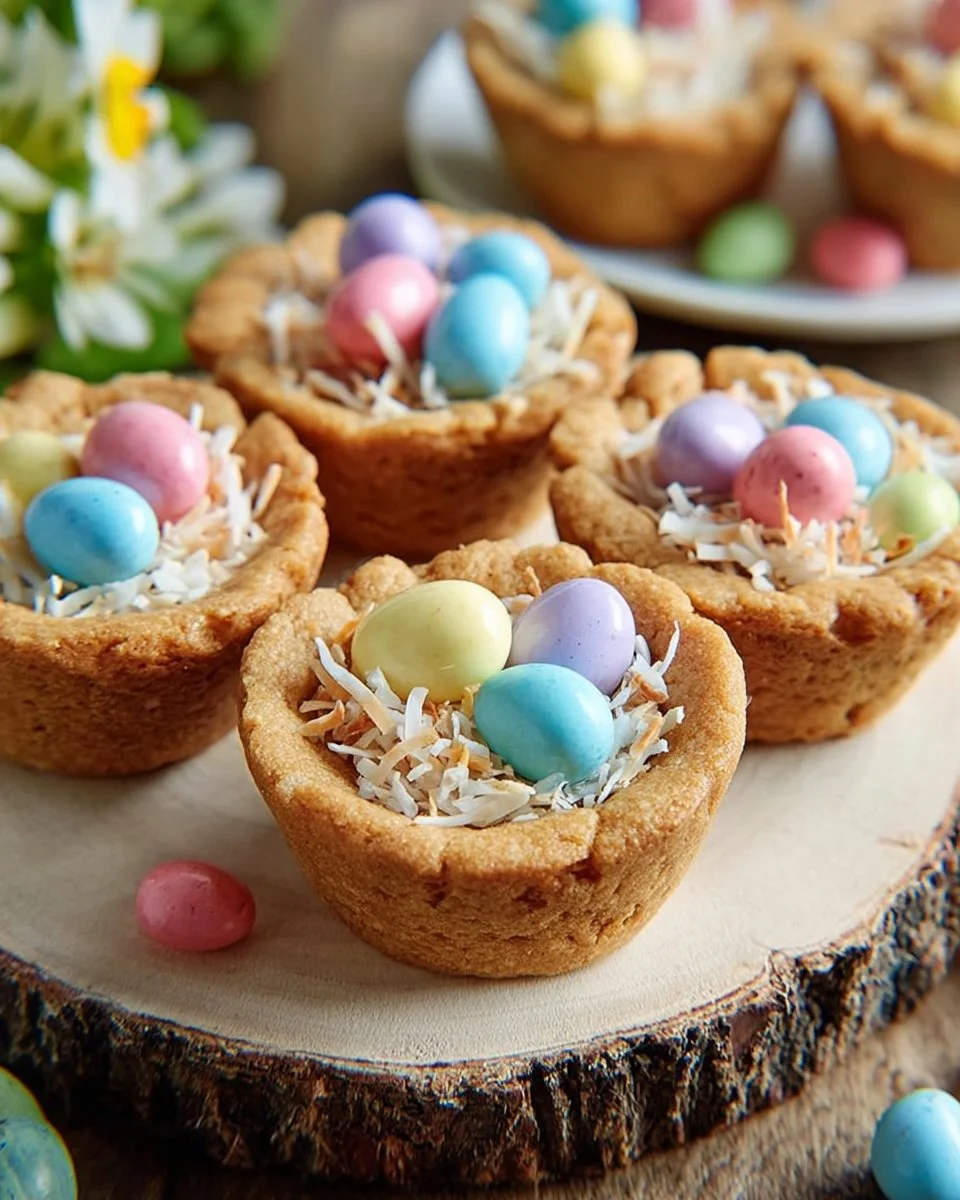
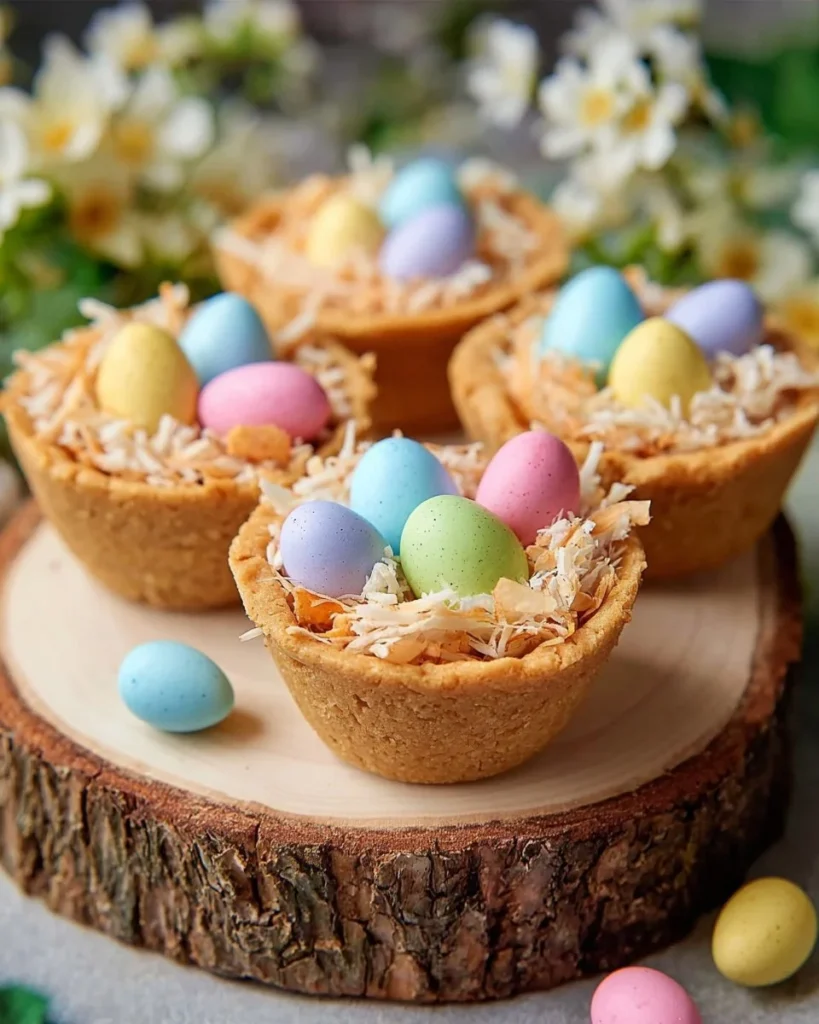
Easter Cookie Nests
- For a nest look, press the dough into the pan with a spoon to leave a deep center. Bake as above.
- Fill with chocolate spread, then top with sweetened shredded coconut to look like nest grass. Add chocolate or candy coated eggs for a festive touch.
Cookie Cup Options
- Fill warm cups with a dollop of peanut butter and press a chocolate chip on top.
- Add caramel sauce and sea salt for a richer sweet.
- Scoop in pudding or ice cream just before serving for a cool dessert.
- Top with fruit and whipped cream for a lighter option.
HOW TO SERVE Easy Cookie Cups
Serve these cookie cups at room temperature or slightly warm. Warm cups release nice aromas and help soft fillings melt slightly. You can put a small scoop of ice cream in each cup and add a drizzle of chocolate or caramel. For parties, place cups on a large tray and let guests pick flavors. If you want a themed table, pair them with other holiday cookies like these Christmas sugar cookies Crumbl copycat for variety.
STORAGE & FREEZING : Easy Cookie Cups
Store the cookie cups in an airtight container at room temperature for up to 4 days. If you fill them with cream or ice cream, store the shells and fillings separately. To freeze baked shells, arrange them on a tray and freeze until solid, then place them in a freezer bag for up to 3 months. Thaw at room temperature and refresh in a low oven for a few minutes if you want them warm. For a savory meal plan or side idea, these sweet cups make a fun finish alongside dishes like creamy Cajun chicken pasta at a weeknight dinner.
SERVING SUGGESTIONS
- For kids: fill with mini chocolate chips and sprinkles.
- For a coffee bar: offer with small cups of espresso, and a few cookie cups topped with whipped cream.
- For a brunch: add a small spoonful of lemon curd and a berry on top.
- For gifts: stack cooled cookie cups in clear boxes, tie with ribbon, and add a label.
VARIATIONS
- Chocolate cookie cups: add the optional 1/3 cup cocoa and extra chocolate chips for a double chocolate cup.
- Nutty cups: fold toasted chopped nuts into the dough for crunch.
- Fruit & oat: add small pieces of dried fruit and reduce chips to keep a balanced texture.
- Mini cups: use a mini muffin pan and bake for 8–10 minutes for bite-sized treats.
- Gluten-free: swap in a 1:1 gluten-free flour mix and bake the same way, checking for doneness.
FAQs
Q: Can I use store-bought cookie dough to make cookie cups?
A: Yes. Press store-bought dough into the muffin pan the same way and bake until set. Watch the time as store dough can bake faster.
Q: How do I stop the cookie cups from sticking to the pan?
A: Grease the pan well, use paper liners, or let the cups cool fully before trying to remove them. A light spray of cooking oil and a small offset spatula help.
Q: Can I put raw eggs in the filling for the cups?
A: No. If you use custard or mousse, be sure it is made with cooked or pasteurized eggs. Or use store-bought fillings that are ready to serve.
Q: How do I make the edges crisp and the centers soft?
A: Bake until the edges just turn golden and the center looks set but not hard. Let the cups cool in the pan a few minutes so the centers finish cooking gently.
Q: Can I make these ahead and freeze?
A: Yes. Bake the shells and freeze them in layers separated by parchment. Thaw before filling.
MAKE-AHEAD TIPS FOR Easy Cookie Cups
Make the dough a day ahead and keep it covered in the fridge. When you are ready, press and bake the cups. You can also bake the shells days ahead and store them airtight at room temperature. Fill them right before serving for the best texture. If you plan to freeze, freeze baked shells on a tray before bagging to keep their shape.
Easy Cookie Cups
Ingredients
Method
- Preheat the oven to 350°F (175°C). Grease a muffin pan with cooking spray or use paper liners.
- In a bowl, whisk together the flour, baking soda, baking powder, and salt. Set aside.
- In a large bowl, cream the butter, sugar, and brown sugar until smooth. Add the eggs one at a time and mix. Stir in the vanilla.
- Slowly add the dry mix to the wet mix. Stir or mix until the dough forms. If you want chocolate cups, sift in the cocoa powder and mix until even.
- Fold in the candy, nuts, or dried fruit if desired.
- Scoop a heaping tablespoon of dough into the prepared muffin pan.
- Press the dough into the bottom and up the sides to form a cup shape, coming up the sides about 1/4 to 1/2 inch.
- Bake for 10–12 minutes until the edges are golden brown and centers are set.
- Remove from the oven and immediately press the center with the back of a spoon to deepen the cup shape as they cool. Allow to cool fully in the pan, then carefully remove.
- Serve cookie cups at room temperature or slightly warm. Warm cups release nice aromas and help soft fillings melt slightly.
- Fill with ice cream and add a drizzle of chocolate or caramel, or let guests pick flavors on a large tray.