
INTRODUCTION
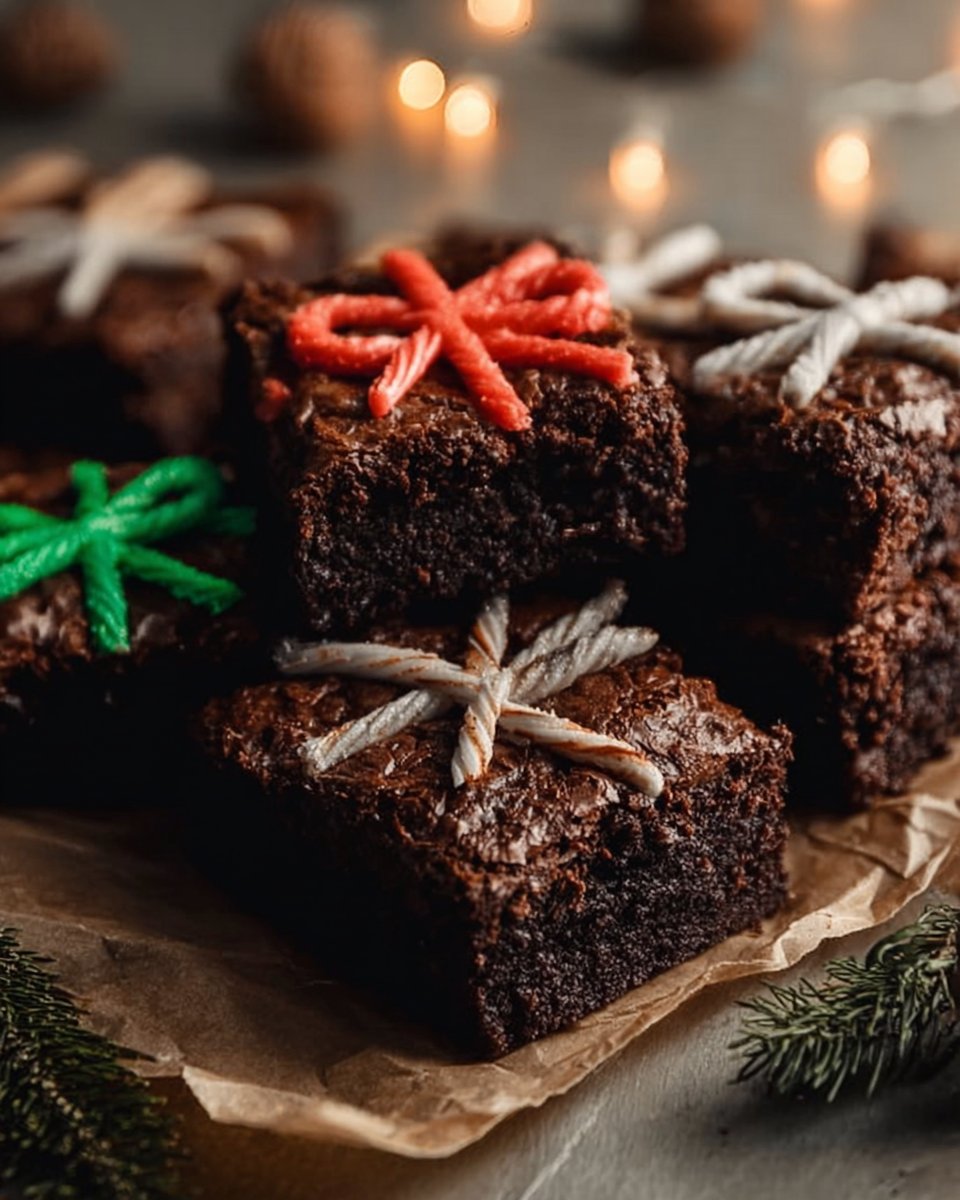
Christmas Present Brownies are a fun and festive treat for the holiday season. These brownies are rich and fudgy, topped with vibrant decorations that resemble presents. They bring joy and sweetness to any Christmas celebration. Whether you are baking for family, friends, or coworkers, these brownies are a perfect choice. They are simple to make and will impress everyone. The combination of chocolate and colorful candy melts adds a fun twist to a classic dessert.
WHY YOU WILL LOVE THIS RECIPE
You will love this recipe because it is easy to follow and delivers delicious results. The brownies are moist, chewy, and filled with chocolate goodness. The decorations turn an ordinary brownie into a festive dessert that can brighten up any gathering.
Another reason to love this recipe is its versatility. You can customize the colors and decorations to match your holiday theme. You can also make these brownies as a thoughtful gift for friends and family. They are not only tasty but also visually appealing, making them perfect for the festive season.
Moreover, making brownies from scratch allows you to control the ingredients and adjust them to your taste. You can choose to add more chocolate chips for extra richness or reduce sugar for a less sweet treat. This recipe is sure to become a favorite during the Christmas season and beyond.
HOW TO MAKE Christmas Present Brownies
Making Christmas Present Brownies is a delightful process. You will need some basic equipment and ingredients. Follow the step-by-step instructions to create this yummy treat.
EQUIPMENT NEEDED
To make Christmas Present Brownies, you will need the following equipment:
- A 9×13-inch baking pan
- Parchment paper
- Medium saucepan
- Rubber spatula
- Mixing bowls
- Whisk
- Microwave-safe bowls for melting candy melts
- Cutting board
Ingredients You’ll Need:
- 1 cup (2 sticks) unsalted butter
- 2 cups granulated sugar
- 4 large eggs
- 1 teaspoon vanilla extract
- 1 cup all-purpose flour
- 1 cup unsweetened cocoa powder
- ½ teaspoon baking powder
- ¼ teaspoon salt
- 1 cup semi-sweet chocolate chips (optional for extra fudginess)
- Red, green, and white candy melts (for decoration)
- Mini candy bows or holiday sprinkles (optional but festive!)
STEP-BY-STEP INSTRUCTIONS
Prepare the brownie batter
- Preheat your oven to 350°F (175°C).
- Line a 9×13-inch baking pan with parchment paper, leaving a little overhang on the sides for easy removal later.
- In a medium saucepan, melt the butter over low heat.
- Once melted, remove from heat and whisk in the sugar until smooth and shiny.
- Let it cool slightly before adding the eggs and vanilla extract, whisking continuously until the mixture looks thick and glossy.
Add the dry ingredients
- In another bowl, sift together the flour, cocoa powder, baking powder, and salt.
- Gradually fold the dry ingredients into the wet mixture using a rubber spatula.
- Stir until everything is well combined and smooth—avoid overmixing so your brownies stay chewy.
- If you’re feeling extra indulgent, fold in a cup of chocolate chips for that rich, gooey bite.
Bake the brownies
- Pour the batter evenly into your prepared pan and smooth the top with a spatula.
- Bake for about 30–35 minutes, or until a toothpick inserted in the center comes out with a few moist crumbs (not wet batter).
- Don’t overbake—brownies continue to cook slightly after being removed from the oven.
- Let them cool completely in the pan before decorating.
Cut and decorate like gifts
- Once the brownies are cool, lift them out of the pan using the parchment paper and place them on a cutting board.
- Cut into even squares—these will be your “presents.”
- Melt the red, green, and white candy melts in separate bowls (microwave in 15-second bursts, stirring in between until smooth).
- Drizzle or pipe the melted candy over each brownie in crisscross lines to resemble ribbons.
- Add mini bows, tiny candies, or festive sprinkles on top for a finishing touch.
Let the decorations set
- Allow the candy melts to harden at room temperature or speed up the process by refrigerating them for 10–15 minutes.
- Once set, arrange your Christmas Present Brownies on a platter or in a gift box lined with parchment paper—they look adorable and taste just as delightful!
HOW TO SERVE Christmas Present Brownies
Christmas Present Brownies can be served in various ways. You can place them on a festive platter and serve them during holiday gatherings. They also make wonderful treats for dessert at Christmas dinner. For a fun idea, place individual brownies in decorative boxes or bags to give as gifts.
You can also serve them warm with a scoop of vanilla ice cream. The combination of warm brownies with cold ice cream is irresistible. Cut the brownies into smaller pieces for a bite-sized treat at holiday parties.
STORAGE & FREEZING: Christmas Present Brownies
Christmas Present Brownies can be stored in an airtight container at room temperature for up to five days. If you want to keep them fresh longer, you can refrigerate them. Just make sure to let them come to room temperature before serving.
If you wish to freeze brownies, wrap them tightly in plastic wrap and then in aluminum foil. This will help keep them fresh. They can be frozen for up to three months. When you are ready to eat them, let them thaw at room temperature before enjoying.
SERVING SUGGESTIONS
When serving Christmas Present Brownies, consider pairing them with:
- A cup of hot cocoa
- Eggnog for a festive touch
- Whipped cream or fresh berries for added flavor
- A drizzle of chocolate syrup for extra sweetness
These pairings will enhance the overall experience and make your dessert stand out even more.
VARIATIONS
You can customize this recipe in many ways:
- Nutty Delight: Add chopped walnuts or pecans to the brownie batter for a nutty flavor.
- Minty Treat: Mix in peppermint extract or crushed peppermint candies to give brownies a refreshing taste.
- Marbled Brownies: Swirl in some cream cheese batter for a marbled effect before baking.
- Different Chocolate: Use white chocolate chips or melted white chocolate to create a different flavor profile.
Each variation will give your Christmas Present Brownies a unique twist while keeping the same festive spirit.
FAQs
1. Can I use dark chocolate instead of cocoa powder?
Yes, you can use dark chocolate. Just melt it with the butter and adjust the sugar according to your taste.
2. How do I know when brownies are done baking?
Check for moist crumbs on a toothpick inserted into the center. If it comes out with wet batter, they need more time. If it has dry crumbs, they may be overbaked.
3. Can I decorate these brownies in advance?
Yes, you can decorate them a day ahead. Just make sure to store them in an airtight container to keep them fresh.
4. Are these brownies gluten-free?
To make them gluten-free, substitute all-purpose flour with a gluten-free flour blend. The texture may vary slightly, but they will still taste delicious.
MAKE-AHEAD TIPS FOR Christmas Present Brownies
If you want to prepare in advance, you can make the brownie batter and store it in the fridge for up to 24 hours before baking. This allows the flavors to develop. You can also bake the brownies a day or two before you plan to serve them. Just make sure to cool and store them properly as mentioned above.
Whether you make these for yourself or as a delightful gift, Christmas Present Brownies will surely spread joy and cheer to all who enjoy them. Happy baking!
Christmas Present Brownies
Ingredients
Method
- Preheat your oven to 350°F (175°C).
- Line a 9×13-inch baking pan with parchment paper, leaving a little overhang on the sides.
- In a medium saucepan, melt the butter over low heat.
- Remove from heat and whisk in sugar until smooth and shiny.
- Let cool slightly, then add eggs and vanilla extract, whisking until thick and glossy.
- Sift together the flour, cocoa powder, baking powder, and salt in another bowl.
- Gradually fold the dry ingredients into the wet mixture with a rubber spatula until well combined.
- Optionally fold in chocolate chips for extra richness.
- Pour the batter into the prepared pan and smooth the top.
- Bake for 30-35 minutes or until a toothpick comes out with a few moist crumbs.
- Let cool completely in the pan before decorating.
- Lift brownies out of the pan using the parchment paper and cut into squares.
- Melt the candy melts in separate bowls and drizzle over each brownie.
- Add mini bows or sprinkles on top for decoration.
- Allow decorations to set at room temperature or refrigerate for 10-15 minutes.